You must have your specification and drawing files prior to filing ready for uploading in pdf form.
You must also first download and fill in the files you want to submit and upload as part of the filing process using the electronic filing system. The files can be downloaded from https://www.uspto.gov/patents/apply/forms
Right-click on the link to the form and select “Save link as” or equivalent.
The forms that are going to be uploaded together with the specification and drawings of the patent in this example are:
1. Application Data Sheet or aia0014.
2. Oath or Declaration filed or aia0001.
3. Certification of Micro Entity (Gross Income Basis) or aia0015a.
To start filing your patent application online, go to:
https://www.uspto.gov/patents/apply
The file online links can be seen in figure 1:
https://www.uspto.gov/patents/apply
The file online links can be seen in figure 1:

Fig. 1: The File Online Links of the United States Patent and Trademark Office (USPTO).
Click on EFS-Web for Unregistered eFilers.
A first new window for unregistered efilers opens as shown below in figure 2:

Fig. 2: Top First Window for an Unregistered E-filer.
Complete last, first name, and e-mail address. Under Main Functions select New application/processing. Figure expands as shown in figure 3 below:

Fig. 3: Bottom First Window for an Unregistered E-filer.
Under Select Type of New Application/Processing, select Utility and then Nonprovisional Application under 35 USC 111(a).
Click Continue.
A new second window opens as shown below in figure 4:
Fill in the top half of the second window by selecting Application Data. Fill in Title of Invention, First Name, and Last Name. It should look as follows:
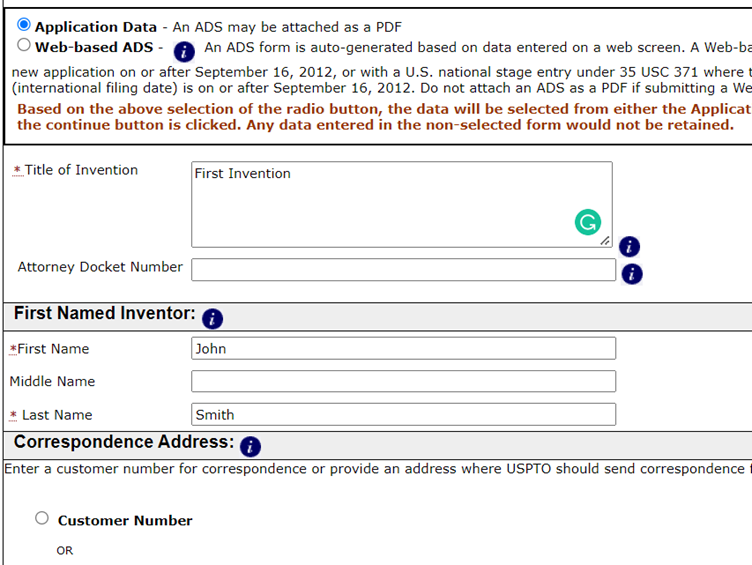
Fig. 4: Top Part of Second Window Showing Applicaton Data Selected and Title of Invention, First and Last Name Filled In.
Select Correspondence address.
Complete as follows:

Fig. 5: Bottom of Second Window Showing Correspondence Address.
Click Continue.
The following third window opens as shown in figure 6 below showing the application data:

Fig. 6: Top of Third Window Showing Captured Application Data.
As mentioned, you must download and fill in the files you want to submit and upload.
To unload files to be submitted first click on the Choose File button under the heading Files to be Submitted. Then navigate to the file on your computer. Then under the Category heading from the drop-down list select the category. The under the Document Description heading from the drop-down list select the document description.
In more detail do the following:
1. Click on Choose File. Navigate on your computer and select for example Specification.pdf. Under the Category heading from the drop-down list select the category Application Part from the drop-down list. Under the Document Description heading from the drop-down list select Specification from the drop-down list.
2. Click on Add File.
3. Click on Choose File. Navigate on your computer and select for example Drawings.pdf. Under the Category heading from the drop-down list select the category Application Part from the drop-down list. Under the Document Description heading from the drop-down list select Drawings-only black and white drawings from the drop-down list.
4. Click on Add File.
5. Click on Choose File. Navigate on your computer and then select for example ApplicationDataSheetaia0014.pdf. Under the Category heading from the drop-down list select the category Application Part from the drop-down list. Under the Document Description heading from the drop-down list select Application Data Sheet from the drop-down list.
6. Click on Add File.
7. Click on Choose File. Navigate on your computer towards and then select
Declarationaia0001.pdf. Under the Category heading from the drop-down list select the category by choosing Application Part from the drop-down list. Under the Document Description heading from the drop-down list select Oath or Declaration filed from the drop-down list.
8. Click Add File.
9. Click on Choose File. Navigate on your computer towards and select for example
MicroEntityGrossIncomesb0015a.pdf. Under the Category heading from the drop-down list select the category Entity Status Correspondence from the drop-down list. Under the Document Description heading from the drop-down list select Certification of Micro Entity (Gross Income Basis) from the drop-down list.
After submitting the files it should be as shown in figure 7 below.

Fig. 7: Bottom Part of Third Window Showing Files to be Submitted, Category, and Document Description.
Click Upload & Validate.
The upper or top part of the 4th new window is shown below in figure 8.

Fig. 8: Top Part of the Fourth Window Showing Application Data.
The lower part of the 4th new window is shown below in figure 9. It shows the files uploaded.

Fig. 9: Bottom Part of the Fourth Window Showing Files Uploaded with No Validation Errors.
As can be seen, all the files were uploaded and there were no validation errors found.
Click Continue.
A 5th window opens. The top part of the 5th window is shown in figure 10. Click on Micro Entity. The filing, search and exam fees for a micro-entity are displayed. Select the Filing, Search and Exam fees for a micro entity.

Fig. 10: Top Part of 5th Window, Select Micro Entity, Filing, Search, Exam.
The bottom part of the 5th window is shown in figure 11.

Fig. 11: Bottom Part of 5th Window, Click Calculate.
Click Calculate and the utility patent application fees are calculated.
Then click Continue.
A 6th window opens. The top part of the 6th window is shown in figure 12 below.

Fig. 12: Top Part of 6th Window.
The bottom part of the 6th window to review the document is shown in figure 13 below.

Fig. 13: Bottom Part of 6th Window To Review Document.
Click on Submit.
The seventh window is displayed in figure 14. It states in this example the total fees that are due is $455.00.

Fig.14: Seventh Window Showing Application Number, Confirmation Number, EFS ID and Total Fees Due.
It states the application number, confirmation number EFS ID and the total fees due.
Select YES! I want to pay now
Then select, for example, a credit card as a payment method.
Complete the credit card details as shown in figure 15 below.

Fig.15: Complete Credit Card Details.
Click on Confirm charge information for this Credit Card transaction.
When you are finished the following options become available as in figure 15.

Fig.16: Can Print or Save Receipt.
From the actions available you can print the receipt or save the receipt.


No comments:
Post a Comment